Tips: Load a VRM with Shaders Other Than MToon
This page explains how to create a .mouv (Material Override Unity VRM) file with replacement materials and display it in VMagicMirror.
These steps are for users who already have a VRM model and non-MToon material assets they want to apply, for example after converting a VRChat avatar to VRM.
Both VRM 1.0 and VRM 0.x models are supported, but VRM 1.0 is recommended for better stability.
Features and Limitations
You can use a VRM as the base model and replace just its materials with materials of your choice. Parts without an override keep their original VRM materials.
- Requires VMagicMirror v5.2.0 or later.
- Replacement materials must use shaders that support URP (Universal Render Pipeline). Correct rendering is not guaranteed for every shader or configuration.
- VRM expressions that use MaterialBinding, such as expressions that change material colors or UVs, are not guaranteed to work with material overrides.
- Export uses the original VRM data. Changes or additions to meshes, bones, components, and other model features in Unity are not included.
.mouvis a different format from.vrm. It cannot be used directly in general VRM-compatible applications.
NOTE
.mouv files contain compiled shader data. Before redistributing a .mouv file, check that the terms of use for the shaders it includes allow redistribution in this form.
1. Open the Template Project
Use the template project provided by MaterialOverrideVrm. It includes the required packages and URP settings. Models and replacement materials are not included.
- Download
MaterialOverrideVrm-Unity6-v0.3.0.zipfrom the v0.3.0 release page and extract it. - Install Unity 6000.3.13f1 (Unity 6.3 LTS) using Unity Hub.
- In Unity Hub, add the extracted project folder containing
Assets,Packages, andProjectSettings, then open it with the Unity version above. Wait for package downloads and importing to finish. - Open
Assets/Scenes/Export.unityfrom the Project window.
NOTE
If you use Unity 2022, you can instead download MaterialOverrideVrm-Unity2022-v0.3.0.zip from the same release page and open it with Unity 2022.3.22f1.
NOTE: Installing into an Existing Project
You can also install the package into an existing project through UPM. Back up the project before making changes.
Add the following UniVRM dependencies to dependencies in Packages/manifest.json:
"com.vrmc.gltf": "https://github.com/vrm-c/UniVRM.git?path=/Packages/UniGLTF#v0.131.4",
"com.vrmc.vrm": "https://github.com/vrm-c/UniVRM.git?path=/Packages/VRM10#v0.131.4"
Then open Window > Package Manager, select + > Add package from git URL..., and install the package using this URL:
https://github.com/malaybaku/MaterialOverrideVrm.git?path=/Packages/com.baxter.material-override-vrm#v0.3.0
Installing the package alone does not switch the project to URP. For Unity 6, also specify "com.unity.render-pipelines.universal": "17.3.0" in dependencies in Packages/manifest.json (use URP 14.0.10 for Unity 2022).
Open Tools > Material Overridable VRM > URP Export Setup and follow the dialog to apply the URP settings. Existing materials are not converted automatically, so prepare URP-compatible replacement materials as well.
2. Prepare the VRM and Replacement Materials
- Add the original VRM file under
Assetsin the Project window and wait for importing to finish. - Drag the imported model prefab into the Hierarchy to place it in the scene, and set its position to the origin
(0, 0, 0). - Import your URP-compatible shaders, materials, and textures into the project. Set the shaders and parameters on your materials.
- Select the model’s root (its top-level GameObject) in the Hierarchy, then use
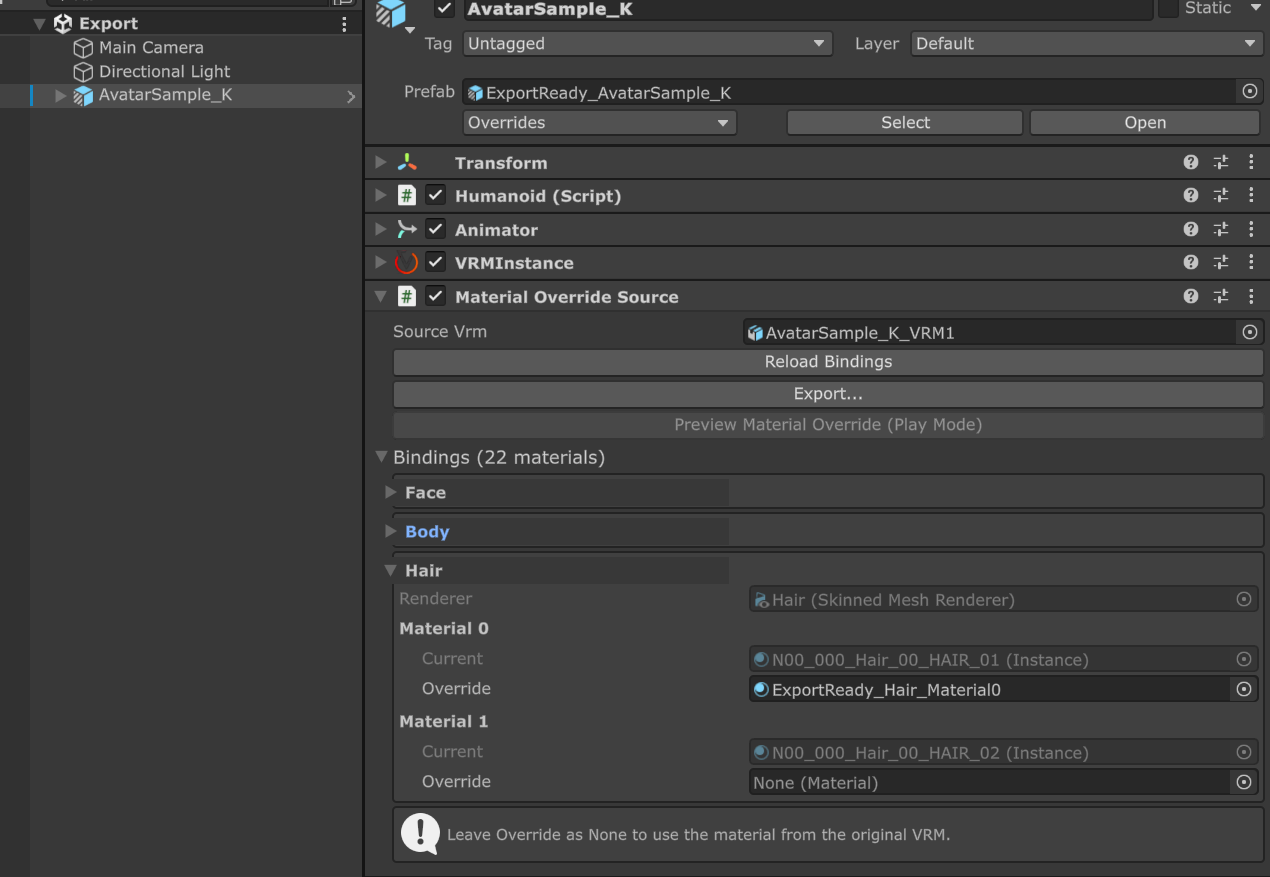
Add Componentin the Inspector to addMaterialOverrideSource. - Check that
Source Vrmreferences the original VRM. If it was not assigned automatically, assign the original VRM from the Project window. - Expand
Bindings. Material slots such asMaterial 0are grouped by Renderer names such asFaceandBody. Check the original material inCurrent, then drag your replacement material intoOverridefor each slot you want to replace.
Current is read-only. Slots with Override left as None use the original VRM material. You can assign the same material to multiple slots. Assign replacements through Override, rather than editing the Renderer’s material fields directly.
Save the configured scene.
NOTE
Export may fail if a replacement material directly references a texture embedded in the original VRM. In that case, save the required texture as a separate asset, such as a PNG, and reference that asset from the material.
3. Check the Preview
- Press the Unity Editor’s Play button to enter Play Mode.
- Select the model’s root in the Hierarchy and press
Preview Material Override (Play Mode)on itsMaterialOverrideSourcecomponent in the Inspector. - Check the Scene or Game view to confirm that the intended parts use the replacement materials and that colors, textures, and other visual settings look correct.
- Press the Play button again to exit Play Mode.
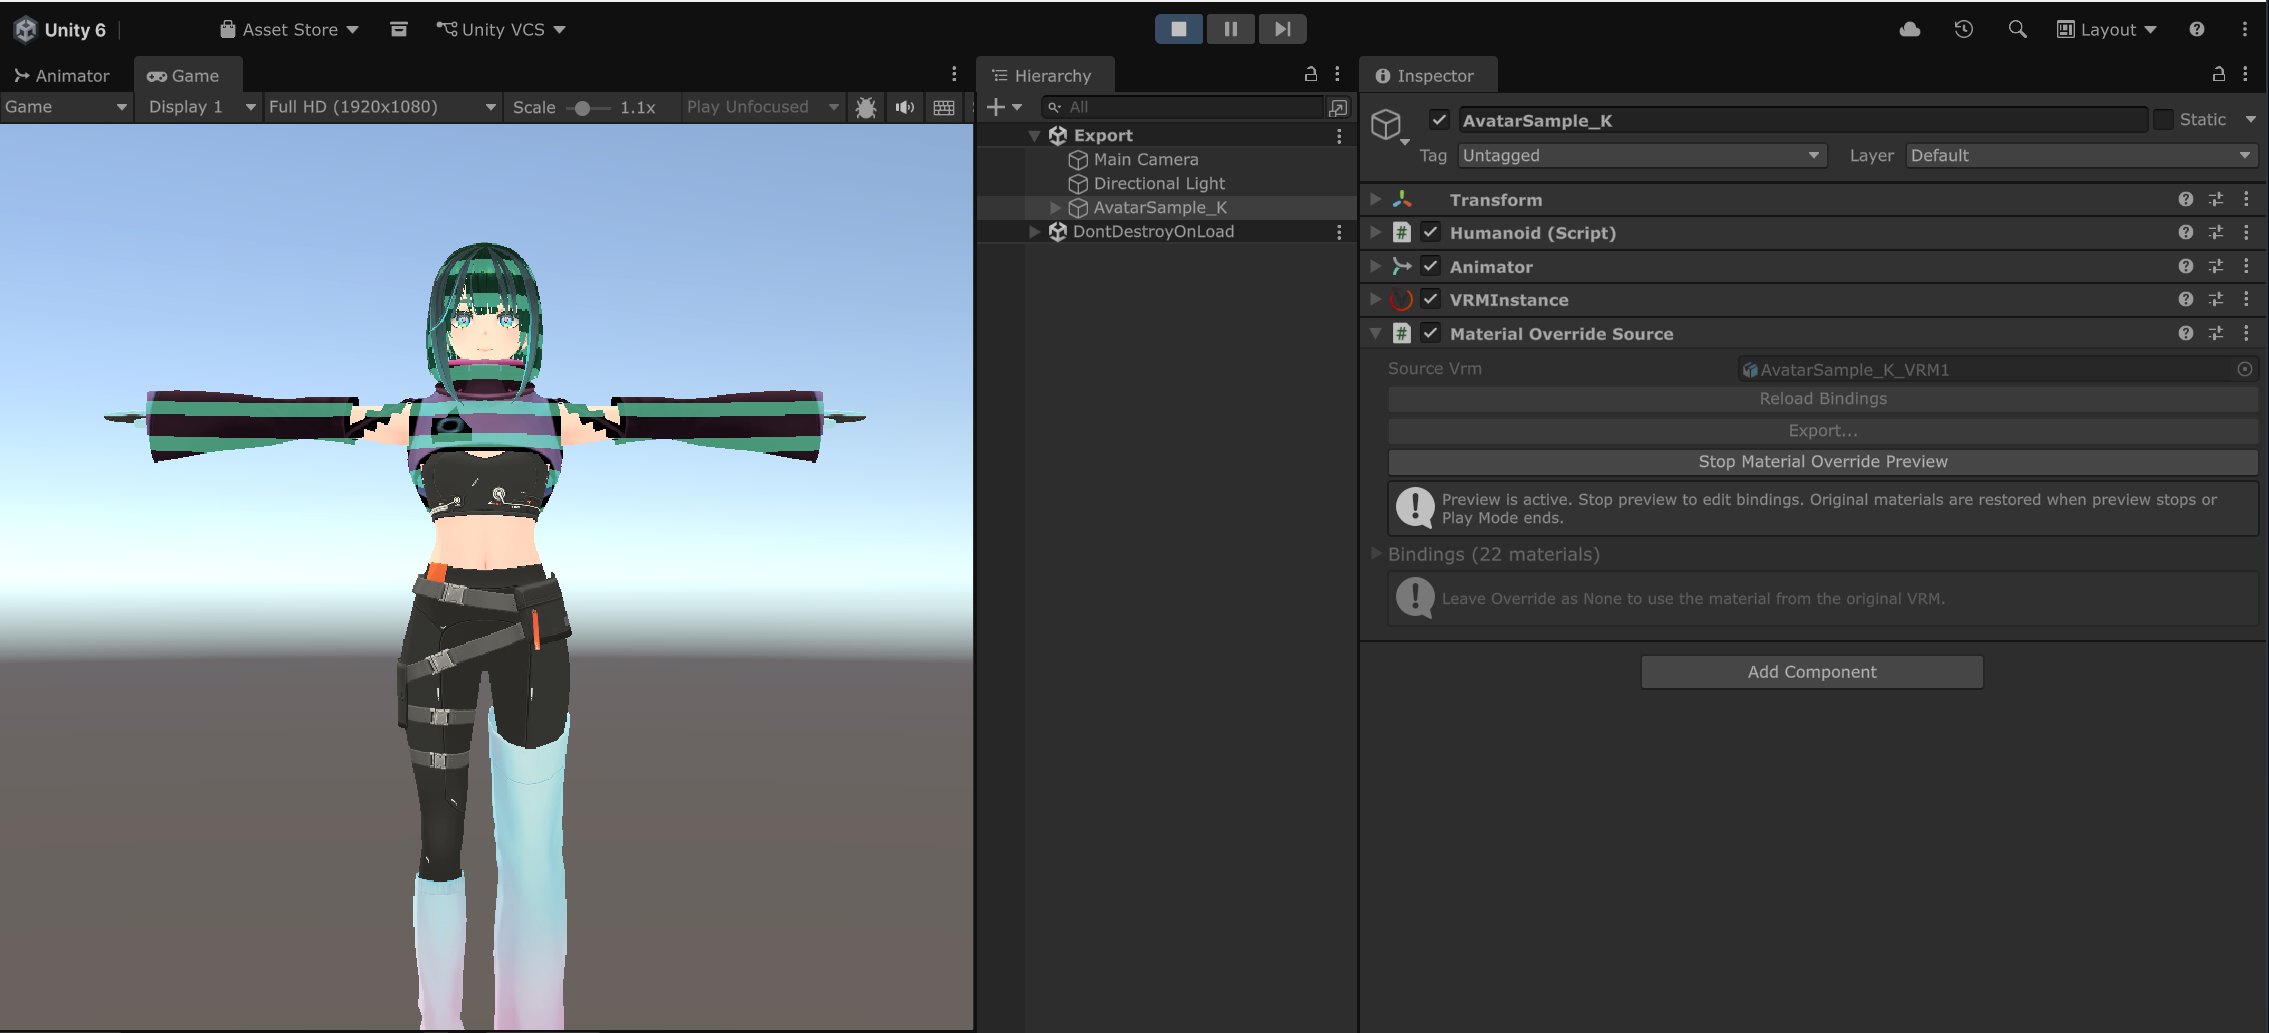
Bindings cannot be changed while the preview is active. To make corrections, exit Play Mode, change the settings, and preview again. Changes made during Play Mode are lost when it ends, so adjust materials and Bindings in Edit Mode.
The preview restores the original materials when it ends. The Override assignments you made in Edit Mode are still used for export.
4. Export the .mouv File
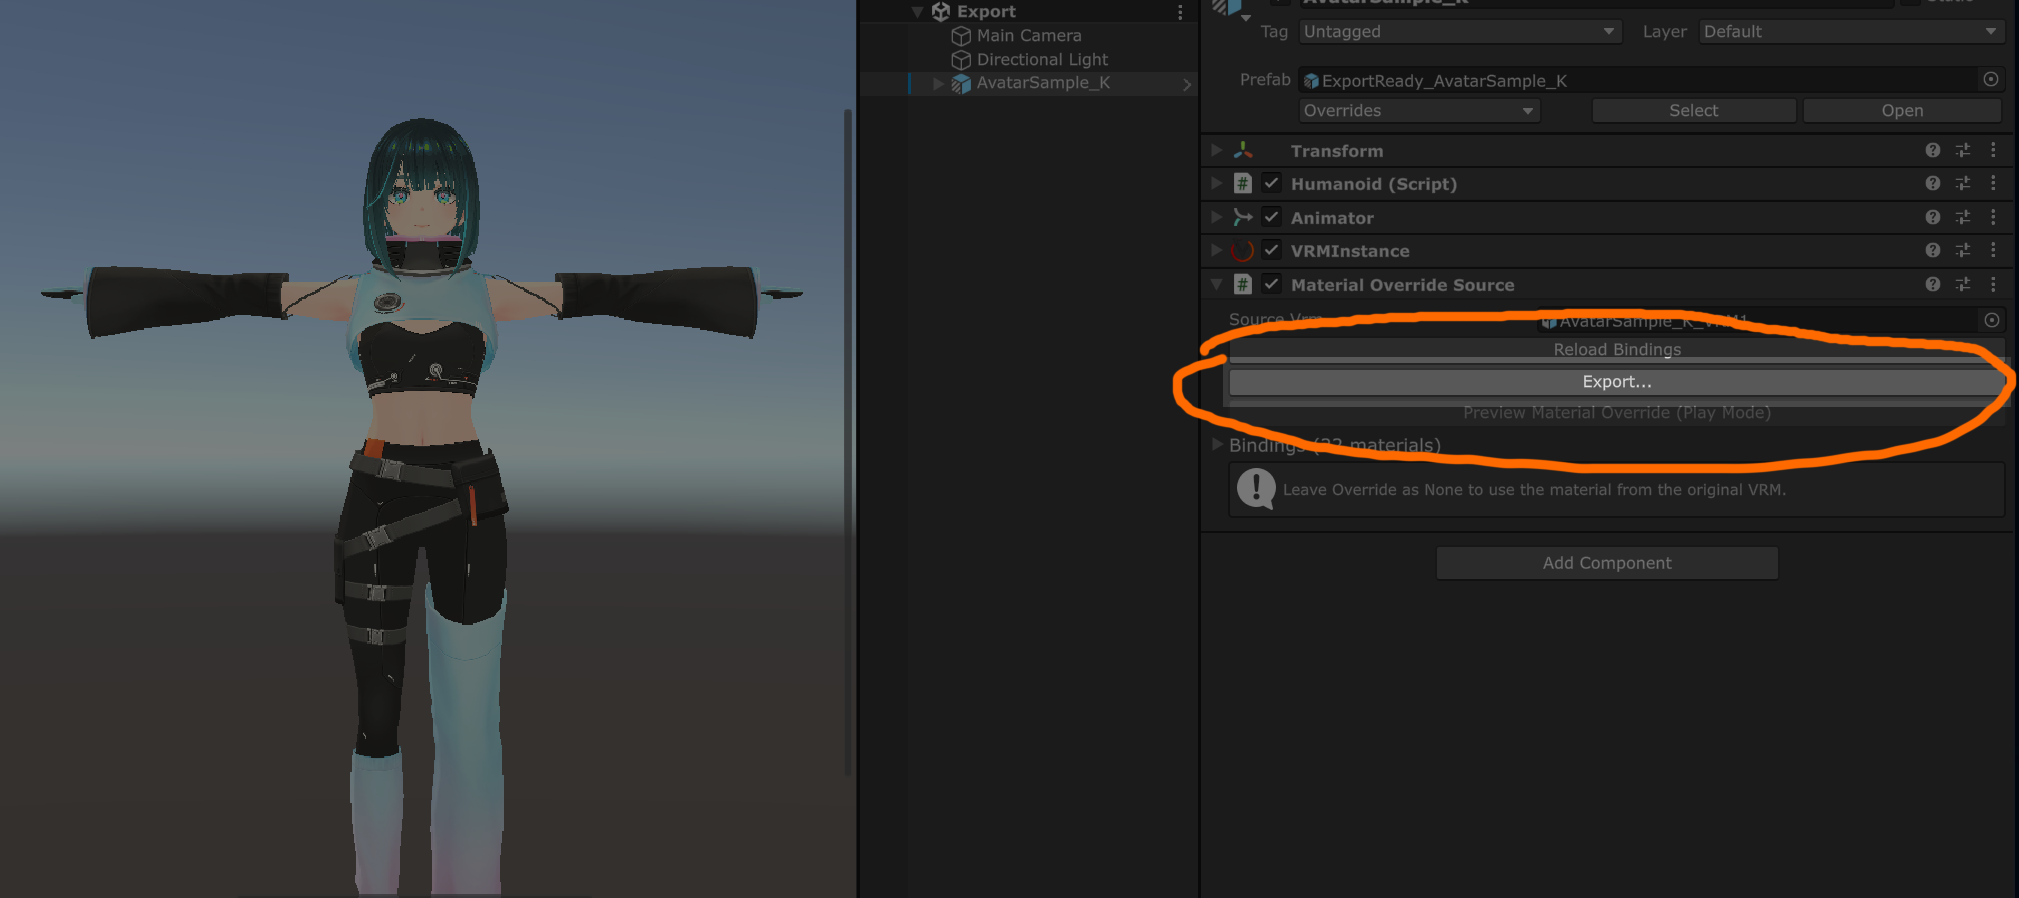
- With Play Mode stopped, set the build target to Windows. Use
File > Build Profilesin Unity 6 orFile > Build Settingsin Unity 2022 to check and switch the target. - Select the model’s root and press
Export...onMaterialOverrideSource. - Choose a destination and file name to export the
.mouvfile.
NOTE
If you switched a project from the Built-in Render Pipeline to URP, such as a project for a VRChat avatar, some shaders, including lilToon, may require explicit shader regeneration after the switch. The pipeline switch may take place when you follow the prompts shown after pressing Export....
If the shaders have not been regenerated, the exported .mouv may load in VMagicMirror without any errors, but the model itself may be invisible. If shadows are enabled, only the shadow may appear. If you encounter this symptom, first confirm that the project’s Render Pipeline is set to URP, then follow your shader’s instructions to regenerate it for URP and export the .mouv again.
5. Load the File in VMagicMirror
In VMagicMirror v5.2.0 or later, the avatar file picker accepts .mouv as well as .vrm. Select the exported .mouv file to display the model with its replacement materials.